Customising The Properties File
Every Activity, Deliverable and Node on a Process Map can store data, and the definition of the data to be stored is contained in a Properties file. This is generally customised as part of the System Implementation, but it can be changed subsequently. By default, this file is stored in the MapStore/Stencil, Template and Properties.
You can edit the Properties file using the Properties Editor or directly, following the guidelines below.
Before you start editing the Properties file, you may find it useful to read Understanding the Properties file which shows how the Properties are displayed and their values can be input. It would also be useful to a knowledge of XML.
Editing the Properties file
The Properties file is an XML file and you can edit it in any text editor such as Notepad.
NOTE: Please ensure that you take a backup of the original file before making any changes.
The following sections outline the structure and appearance of the XML file, and provide guidelines for editing it.The XML file comprises three groups; one for the activities, one for the deliverables and one for the node.
The first section within the Activities section is:
<group groupName="PeopleAndOrganisation" groupCaption="People and Organisation">
<row rowName="Responsibility" rowCaption="Responsibility" rowType="3">
<rowValue>Administrator</rowValue>
<rowValue>Business Analyst</rowValue>
<rowValue>Developer</rowValue>
<rowValue>Director</rowValue>
<rowValue>Employee</rowValue>
<rowValue>Line Manager</rowValue>
<rowValue>IT Support Engineer</rowValue>
<rowValue>Project Manager</rowValue>
<rowValue>Secretary/PA</rowValue>
</row>
</group>
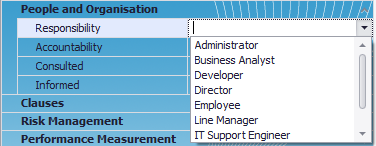
And this appears to the user as:

Groups
A <group> tag defines the first section of Activity properties as People and Organisation:
<group groupName="PeopleAndOrganisation" groupCaption="People and Organisation">
groupName is any unique string within the XML file, and groupCaption is the text string displayed on the Properties tab.
NOTE: groupName must have a unique name in the file and must not contain spaces. Also, a </group> tag is required at the end of the group.
Rows
In a similar way, a row in a group is defined by a <row> tag. For example, where the user has to type in a value, the row would be of the form:
<row rowName="RiskDesc" rowCaption="Risk Description" rowType="0"/>
In the above example where we have a dropdown, the row would be of the form:
<row rowName="Responsibility" rowCaption="Responsibility" rowType="3">
rowName is used to generate the custom property name in Visio's ShapeSheet. For this reason, it should only contain alphanumeric characters (no spacing or punctuation).
NOTE: rowName must be unique and cannot be duplicated anywhere else within the XML file.
rowCaption is the row name as displayed in the Properties tab.
rowType is one of the following options:
| 0 | String value | A text edit field is displayed to the user. |
| 3 | Dropdown list | The user sees a dropdown list from which they can select one item. |
| 4 | Check box | This is an alternative to having a dropdown list of True and False values. |
| 5 | Date control | A date control to enable easy input of dates |
| 6 | Spin control | Select an integer |
| 7 | Time control | A time edit control to enable easy input of times in a 24 hour clock format |
| 8 | Hyperlink | Enables hyperlinks to be used. |
| 12 | Colour selection | A colour selection control |
In the special case of the drop down list, the items contained in the list are defined as rowValue tags. In our example above, we have:
<rowValue>Administrator</rowValue>
<rowValue>Business Analyst</rowValue>
At the end of the list, there must be a /row tag.
TIP: When changing the properties of a Node, it is recommended that properties are added to the Node and default properties are not deleted. The reason is that even though the XML properties of the Node itself are changed, the Node will still look for the default properties. In addition, the Node version bar will not reflect the new changes and will only display the default properties.
Control the Visibility of Custom Properties
Method
A map published to HTML can display the properties of each element in the left-hand pane. Whether such properties are displayed or not can be determined as follows:
- Open the map in Process Navigators Visio Template.
- Select the shape.
- From the Visio menu, Windows > Show ShapeSheet.
- In the Custom Properties section, set the Invisible cell to TRUE or FALSE.
Notes: The Custom Properties section contains properties that are vital to the operation of the shape, and this section should only be edited directly if the consequences are properly understood. This won't affect the visibility of properties in Process Navigator's Properties dialogs - properties in the Properties file will always be displayed - and if a property's value is updated in Process Navigator, the property will be made visible.